


EasyCASE is one application that is used to design a workflow system or better known as DFD (Data Flow Diagram). DFD is very important to analyze the course of the system. The flow of this system reflects the performance of a system. Unlike the other applications, EasyCase gave token of the mistakes made so that the depiction of the output that comes out is actually output by the rules and symbols of each methodology.
There are several options methodology and process model data offered by this application relating to the depiction of the flow system, ie
1.
a. Process Model
b. Yourdon (DFD)
c. Gane and Sarson (DFD)
d. SSADM (DFD)
2.
a. Data Model
b. Martin (ERD and DMD)
c. Merise (ERD)
d. Shlaer-Mellor (ERD)
e. SSADM (ELS and ELH)
f. Each methodology has different symbols and rules.
Here is an example DFD generated EasyCase.
1. Choose a start - and then press the easy case professional Program 4:23 - then at a click. Easy case such as that displayed in the following figure:
2. The next step in the case of professional eassy menu select and click on the file and select the project and on click
3. langah subsequently created in the storage directory and then create a folder in that directory contonya D: \ 06141010 \ Practicum 2 that means we keep our project in Drive D with 06,141,010 directory name. see in the picture below:
4. next steps write an appropriate project name project name and select the icon Define Contact the diagram.
5. type the name of the context diagram on Contack name then ok then ok again. Perhatihkan the following picture:
6. The next step after as above and then click on the diagram define Contack as written click here, the image appears as follows:
7. Then click Ok then Ok again and will appear as follows:
8. Then will appear the dialog as follows:
9. Click Ok to eat will be performing the layer where we design the DFD as follows seseuai screen can be enlarged with the desire. And we can make disaing DFD by creating a process in the context diagaram first. But in Case Eassy usually standard diagram will appear automatically be confirmed over at the click Ok. 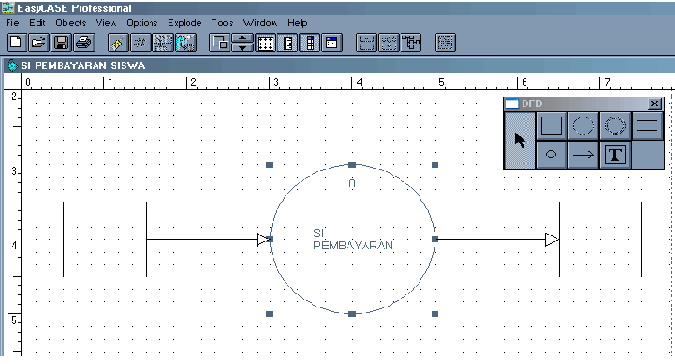
10. From the figure is still above the standard and simple as we can process it and give the name and so on, as follows:
11. With Double-click on the symbol that will be given a name and description given in it to follow up the following dialog appears, then click yes.
12. after select yes will appear as follows:
13. Select the appropriate Type Chil PPS on the image above and then click Ok, can also be done by right-clicking on the object / symbol DFD then select difine Child as above but with way more quickly.
14. Then give a brief description of the dialog text editor, then click Save and then select Close, "This command can also be done primarily to right-click on the object and then pili goto child. 
Bisa Download Software Disini !
this time I will tell you how my steps in creating a shared network folder settings in Windows 7.
The steps to perform this setup is actually simple:
1. Open network and sharing center
2. Set advanced sharing settings on the left upper
3. Then select option enabled network discovery, file sharing, public folder sharing for
4. Then just select the folder which will be shared via Windows Explorer (right click on the folder, select sharing, and enable sharing)
5. Voila! Folder and the shared computer will look at the network on the windows explorer.
Looks easy? Sure.
Unfortunately, it's things that look easy turn out in fact to be (very) difficult.
Setting above appears only successful if computer users only use the machine by means of 'normal', setinggan connection using a router, do not use additional firewalls, etc..
As for me? To connect computers and netbooks I use a cross lan cable by using a static ip (ip just different single digit, same subnet mask), then to the firewall using windows7firewall control that really gives the choice of what programs are allowed to pass (I'm not like a computer I provide these data without my permission). Besides, my computer is also connected to the internet via a modem (which means I have multiple network computers, it is enough to make this more complicated.
When the data step by step here's the problem:
- Setting static ip
The first step, because the direct use of cross lan cable, no router then set static ip settings. Make sure the ip and subnet mask settings correctly. (The easy way, set ip: xxx.xxx.xxx.xxy, (differing only in the last digit and the subnet mask of 255.255.255.0)
- Try to ping - General Failure Error
After ip set, check whether it can send data from computer to a netbook with a ping.
Problems that arise in the ping is usually a general failure error. This happens because the system can not send ping packets due to blocked. This problem usually occurs when using an additional firewall such as norton or windows 7 firewall control. Make sure the program "general service process windows" in the form scvhost can access the file locally.
Another problem that can happen is the destination host unreachable, this is because the purpose was not found. This problem is usually complete when the step 4 has been done.
- Set shared folder
Set of folders which can be shared, just right click on the folder with windows explorer and select share.
- Setting a different network
Well, remember the share change advanced settings on the top left of the network and sharing center? There may be changes in settings such as network discovery, file sharing, etc.. The important thing here is seen in the windows divide the network into three networks, ie public, work, and home. If eg only connected on one computer only then consider all of the network as the public does not matter (even though not recommended). If like me, where a desktop computer connected to the Internet, then as a result my desktop would be connected to a public network. If I set enable file sharing in the public, will certainly pose a potential safety hazard.
Therefore, you should do is to set file sharing only on the home alone. However, this raises a new problem, where a new network with a cable cross that has been made between netbooks and desktops will automatically be set as the public network by Windows 7 and there is no option how to change it back. xD
After struggling a long time, and I found also a way to outsmart. By using only a computer connected to the network is only (in this case my netbook), open windows explorer, and select network. Notification will occur on the network where discovery has not been activated (of course, because the network is still in public). Click the notification, and will show the option that is no, do not enable file sharing for the public, and yes, enable file sharing to the public. Do not select a second, but select the first. For some reason windows will change the network that are connected now, that is before (Unidentified network, public), it automatically becomes work. (Which until now I do not know why .. xD) Now, the public should share in the computer will be detected via netbooks.
- Problems on every time the connection
For each time a connection, usually will need a username and password. Enter once and select save to automatically connect. Unfortunately every time I removed lan cable, before re-emerging problem, so every time you remove and install the cable must perform again the previous steps to create a network that is detected to be public.
- Network shared folder can be used. Give it a shot! Works wonders with SyncToy:)
wiuuuh ..
Eventually settled as well. Microsoft actually provides more features for easy sharing, namely via homegroup.

Postingan Populer
-
this time I will tell you how my steps in creating a shared network folder settings in Windows 7. The steps to perform this setup is actuall...
-
 EasyCASE is one application that is used to design a workflow system or better known as DFD (Data Flow Diagram). DFD is very important to an...
 -
1. What is a virus? A computer virus is a small program that can copy itself in a computer storage media. Formal is as follows: "A prog...
-
Antivirus is a type of software used to detect and remove computer viruses from computer systems. Also called Virus Protection Software. Thi...
-
Virus attacks can be prevented or overcome by using antivirus software. This type of software can also detect and remove computer viruses, p...
-
a. Information systems Information System consists of two words namely Systems and Information. The system itself is a composite of several ...
